Tuesday, 8 October 2013

Front Cowl

The New front fairing i have chosen for the bike will be as mentioned before a CBR600rr 03-04 model. I managed to pick up a front cowl on ebay dirt cheap. thos its slightly damaged and the wrong colour... to work we go.
So looking at the left side of the fairing, there is damage all around the indicator locator:

using a heat gun the decals were removed

a little wd40 to clear all the glue residue off work perfectly

so looking at the damage, figuring out what best to be done...
i pilot drilled all the ends of the hairline crack to stop them spreading, and decided to just cut out the majority of the damage as i dont require the indicator locators for my vision.

Damage cut out

Fibreglass repair

area sanded out

Filler and more sanding

filler primer to show any defects and more filling and sanding

wet and dry sand down, right side complete

left side (no damage)

Indicator locator to be sanded right down.

filler to make it all even and smooth

again filler primer to pick out defects

more filler and filler primer till desired finish is achieved

primer coat

Top Coat (lacquering will be done later)

Friday, 4 October 2013

Front Subframe

Hi all, sorry there hasn't been many posts lately. The plan was to have the bike finished this summer, but from falling pretty ill, making many visits to the hospital, and being told not to lift anything remotely heavy, all kept me away from the bike :( I did however manage to get a few more mods completed.

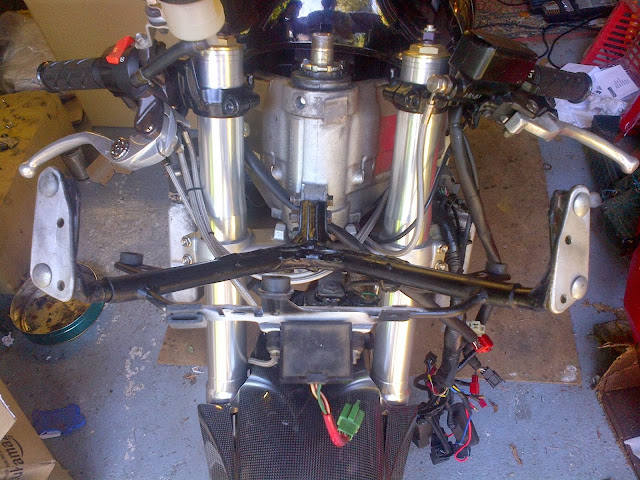
The new look for the bike proposes a new front cowl and headlight, both to which need to be mounted to a front subframe. The vfr front subframe wont support the new additions so a frame needs be created.
Mindful considerations for the build are that it needs to have a mounting point for the new headlight, new front cowl, current relays/sensors/instrument panel, and also allow for complete uninhibited movement of the cbr1000rr front end.

The way i went about making the part was to go step by step, allowing one aspect to fit/work, then adjusting/re-modding it to make another aspect fit/work, and so on...
So first i worked with the current subframe trying to fit it to the frame and allowing full movement on the front end. As the fireblade has much lower down handle bars, there was a problem with the front brake&clutch lever making contact with the instrument cluster, and full lock couldnt be achieved. And so the the front subframe needed to be extended out. Simple solution was to make a bracket...
simple card mock 
plastic mocks to attach

fitted, checking positioning
final design draft
Brackets made :)


Standard vfr front subframe:


Frame built to support instrument panel, relays, bank angle sensor, and brackets to frame:

Brackets to attached to frame bolted on:

Brackets to mount front cowl and wing mirrors made:

Finished:


Sunday, 25 August 2013

Ignition Coil Conversion

Ok so the old style ignition plugs and coils are big, cumbersome, and outdated, they also will make fitting the new fairings i have planned difficult to fit. Time for a revamp...

 - so here is the front left coil, where i sprayed it black and also turned the unit around to see if i could make them fit in with my new ideas
 -Front right coil... even with them black and turned around, they arent goin to work with the new fairings, or they will work but it will look messy.
 - The coils and plugs for cylinder 1 and 3. if im going to replace the front coils, i may aswell do the whole lot and my guesses are i will probably make a nice little weight saving on the way.
 - All the coils, plugs and related bolts/fixings removed!
 - I decided to go with CBR1000rr ignition coils... theyre the same length as the vfr's and use the same 2 pin wiring connections.
 - I wired up the cbr ignition loom to the vfrs, whacked em all in and hey presto jobs a goodun!... nice and neat direct ignition coils fitted, a less messy looking system that saves weight too.
 - The only remnants of the old coils are holes for the rubber grommet nuts to fit the old units to the frame.
I'll think of a way to patch these over at some point.
- A lot cleaner looking, this has been a successful little mod

Footrests and Exhaust


A quick little mod i wanted to make was the with the rearsets... I was bidding on some Harris ones to replace, but they ended up selling for silly money and this project isn't about throwing shed loads of money at the bike.
So what to do... get rid of the hero blobs... your knees are a much better lean angle indicator!
Heres the original set up:


I took the pegs off and then realised the standard vfr rider pegs weigh more than expected. I grabbed a spare pair of pillion pegs, cut and drilled them to fit, and instantly its better looking, lighter and cost me nothing

Bought some pillion hangers with nice detailed pegs.


Decided to spray them to match the rear subframe and keep the majority of the bike black.
 Then added a the lockable latch.


So the exhaust has been abit of a head scratch for me in terms of what to do... originally i wanted to create an underseat exhaust, but this is probably a little out of my reach as i don't have the materials or equipment to make this happen.
The main look i wanted to achieve was to make most of the rear wheel (as visible as possible). So next i thought about a micro or stubby can... but researching lengths etc, these cans would still hide some of the wheel.
Here it is without a silencer...
 Ideally i want it to look just like this... if anyone has any ideas how i could achieve this please make a comment... and yes i do need a silencer before anyone suggest running without one.

For the time being i have just stuck with my Scorpion race can, but bent the link pipe enough so that i could angle the can higher (following the straight line of the subframe), making the wheel more visible than the original set up, and held in place with a small bracket i whipped up.

Finished the exhaust off with some titanium heat wrap:


Sunday, 4 August 2013

Headlight/Indicator/Tail Tidy

So need to sort out the reg plate/holder... the 'Volar' intergrated light doesnt have a white down beam to illuminate a licence plate, so ive bought these small 'Viti con LED' lights that bolt directly on the tail tidy ive got...


Tail Tidy in place and lights wired up directly into the side light loom...


 ...Reg plate on...

illuminates nicely, job done :)


Next on the wiring agenda which should be the last in the electrics dept is to sort out the connections for the new Headlight unit and Indicators.
The vfr800 has a great headlight unit in terms of illuminating qualities due to it duel High/Low beams (nice and symmetrical as well), yet is a big unit and displays a touring style bike look. I want to change to headlight to something smaller, willing to compromise on the illumination aspect if necessary.
The the Headlight of choice, continuing with the HONDA continuity, will be a cbr600rr's... changes that need to be made to make this happen are all down to the connectors. And i know people may point out that the cbrs single headlight on low beam looks odd and i may get comments like 'one of your headlights are out', but honda designed the cbrs headlight to be like this, so that oncoming cars at night wont confuse the light as a cars headlight 150yards away (2 beams from a headlight at 30yard would look like a cars headlight at 150yards away).

There is a mod for anyone wanting to keep duel low/high beam on a cbr headlight unit and would require no changes to the wiring. Simply buy H4 bulbs and cut the metal plates the bulb sits in to fit into the cbr light housing. Really simple! Why am i not doing this? - purely because if a headlight blows then everytime you would have to buy a new H4 bulb and then cut the metal mounting plate for it to fit. Rigging up the wiring to the cbrs system means whenever a bulb blows i can simply just buy a H7 bulb and replace it straight away.

 - The vfr uses a H4 connection (left), utilising 3 wires per bulb (high beam, low beam and neutral)... where as the cbr uses a H7 type connection, using only 2 wires per bulb 1.(high beam and neutral) 2.(low beam and neutral)
- The headlight wires get removed from the plastic locating blocks, the spade connectors removed and the wiring loom is stripped back to the start of the left hand indicator wiring stem.
- The 2 sides of headlight wires are matched up so that the low beam (white) wires can be joined together, and the high beam (blue) wires can be extended for the right side headlight.

- The cbr headlight unit has its small central sidelight, similar to a vfrs but with different connectors... connectors removed, replaced with new bullet ones.

- At this point the indicator wires were stripped back and new bullet connectors soldered on to them.


- Using new H4 connectors and simply removing the 3rd wire works perfectly for the new connection. this is then wired up to the loom.

The headlight switch inside the unit on the left handle bar needs to be modified so that current is only drawn to the low beam on a low beam setting and both high and low beams receive currrent on the high beam setting... i achieved this by taking the switch apart and bridging the low beam switch plate with the main headlight loop plate with some solder.
This configuration will give:
Low beam = left bulb ON / right bulb OFF
High beam = left bulb ON / right bulb ON


Wiring all finished and insulated back up!